Pitch Perfect: Part 2

By now we have quite a visually-functional app, but there’s still a lot more that needs to be done before we can even consider it a beta let alone a final release. Aside from actually needing to record the user’s voice, we need to learn how to show a second View (or screen) where the user will be able to modify the audio file with the four effects we have planned.

We’re introduced to the Navigation Controller class, which we drag onto our storyboard. Not much is really known about it yet, other than that it’s responsible for allowing the transition between multiple Views. We’ve added a second View, and now when you press the stop button, you are taken to that View. We learn how you can control both the first View, upon leaving it, and the second View, upon loading it, with several core methods for whether the View will load; did load; will appear; did appear; will disappear; did disappear; and will unload; did unload.

Skipping forward a bit, this View now contains three buttons: an image of a Snail to slow down the audio, an image of a Rabbit to speed up the audio, and another stop button.

Since I already outlined the purpose of this application, you probably already realize what those two image buttons are for. We’re introduced to the AVFoundation Framework. Within this framework are various classes for handling audio/video interaction, but in this app all we care about is audio. We define a new variable of type AVAudioPlayer (a class within AVFoundation) which will act as our internal audio player. Now, when the two buttons are pressed, the audio file (which we previously loaded in, after learning how to add resources to our project and retrieve their path within the bundle) is played. The difference between the two buttons is the rate at which the audio is played: this is achieved by setting the appropriately-named object property, rate, to either 0.5 for slow or 1.5 for fast (with 1 being default speed).

In closing, we now have a functional app which allows a user to press the microphone button to begin “recording,” a stop button which halts the “recording” and takes the user to the next view, a couple of buttons to play an audio file at different speeds, and a final stop button to stop the audio if it’s currently playing. To return to the previous view, the user simply presses the back button at the top left, which is automatically created and managed by the Navigation Controller.

While I do not know for sure what Part 3 will entail, I can only presume we’ll now be recording the user’s voice, saving it, and manipulating that audio file instead of the temporary Forrest Gump clip we were provided.
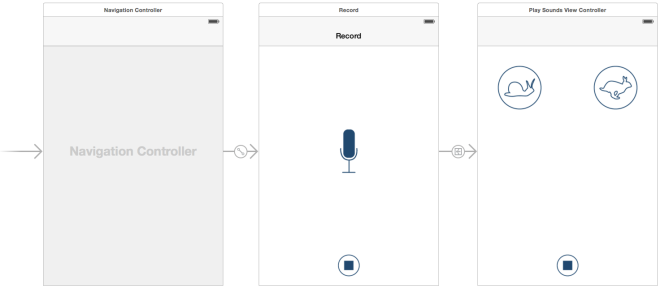
Our main Storyboard showing the relationship between the View Controller, the entry point View, and the secondary View.

Pitch Perfect: Part 2

Pitch Perfect: Part 1

Udacity asks we put forth a minimum of 10 hours per week when enrolled in a Nanodegree program. After just a day, I’ve already set myself up for a successful first week. The initial project we’re learning to develop is called Pitch Perfect. This app will, in the end, allow the user to record their voice, and apply one of four audio effects to it, such as  s l o w i n g  i t  d o w n.

Starting out, Kunal Chawla, the wonderful instructor in the provided video lessons, walks us through opening Xcode for the first time. We learn how to create a new Swift-based project, and get a basic understanding of the interface and the debug simulator we’ll be using, as well as learn how the MVC (Model-View-Controller) relates to iOS apps. The View in this case is what the user sees, so from there, we dive right into adding our very first image-based button to the View, which includes a lesson on how to add image resources for non-retina devices, 2x-resolution image resources for retina devices, and 3x-resolution image resources for the iPhone 6 Plus.

To my surprise, Apple has made it extremely easy to get started. After adding a static image as a button and running the app in the simulator, you get a sense that the image is in fact a button. Clicking it gives a visual indication of it being pressed, and you’re able to change the enabled state of it which can again be visually recognized, all without needing to provide separate images for each state.

Moving on with Kunal’s lessons, he shows us how easy it is to bind a View element, such as our image button (which is of a microphone), to our ViewController (a Swift code file that inherits from UIViewController). When you want an action to occur as the result of a button being pressed, you would create an IBAction (which is an Interface Builder Action). To then have that button show visual feedback, and change the state of something on the View, such as having a label appear, you would bind the label to the ViewController with an IBOutlet. We learn that the difference between an Action and an Outlet is that an Action is a way for the View to tell the Controller that something happened, while the Outlet is a way for the Controller to manipulate (or control) the View. Defining these bindings is incredibly simple: hold the control key, and drag a line from the element over to the Swift code, within the class enclosure, and let go; Xcode will then prompt you for a name, whether it’s an Outlet or an Action, and a couple of other settings.

After a relatively short amount of time, we have a working example of a microphone button that, when pressed, disables itself while a “recording” label and a stop button appear like swift magic. Of course, you can yell into your device’s microphone all you want, at this point it’s not actually recording anything. In fact, we haven’t even gotten to that step in the project just yet!

Pitch Perfect: Part 1

A Swift Beginning

import UIKit
// Swift: A new programming language for iOS and OS X.
class WordPressBlogViewController: UIViewController {
override func viewDidLoad() {
super.viewDidLoad()
println("Hello World")
}
}

Created by Apple, Swift compiles down to (and can be used alongside of) Objective-C. From the moment I watched its birth during the 2014 WWDC Keynote, I knew it was something I wanted to learn. Nearly a decade ago, I began my life as a developer within Microsoft’s .NET environment. Shortly thereafter, I moved on to become a full-stack web developer. It’s been a long time since I’ve developed native applications, but after entering the Apple ecosystem a few short years ago, it’s something I’ve wanted to return to. When Swift was announced, I realized this was my chance to jump in with both feet.

On Tuesday, May 12th, 2015 – yesterday, nearly a year after its introduction – I finally made an important first-step decision: to enroll in Udacity’s Intro to iOS App Development with Swift Nanodegree program, which promises to walk me through developing 4 beginner-level iOS applications, in Swift, while teaching me the necessary skills and understanding I’ll need for the future. At the end of the program, I will be left to my own devices to create any application of my choice — a Capstone Project.

Upon successful completion of the course, I will be awarded a Nanodegree credential and have a small portfolio of example applications readily available, which is a necessity when trying to convince a prospective employer (or client) to hire you and your hopefully-prolific skills. Udacity also offers a lot of guidance and support along the way, so you’ll never be left floundering.

This blog will serve as a way for me to chronicle my journey, posting what I’ve learned along the way, to hopefully help others who are considering this desirable path. If you’re still interested, then read on, swiftly!

A Swift Beginning